| Current Issue : web |
| Current Issue : PDF |
| features |
| At home in the lodge |
|
The
art of collecting art |
|
23 days to rehab your habitat: A homeowner's diary |
| sections |
| Habitat Hits |
| Organize it |
| Know it |
| Fix it |
| Buy it |
| Grow it |
| Pick it |
| information |
| Spring calendar 2007 |
| Luxury Living |
| the guide |
| Last Winter |
| Last Fall |
| Last Summer |
| Editorial Submission |
| Calendar Submission |
| Advertising Submission |
| Advertising Rates |
| About Us |

|
|
Copyright © 2006 Express Publishing Inc. All Rights reserved. Reproduction in whole or in part in any form or medium without express written permission of Express Publishing Inc. is strictly prohibited. The Sun Valley Guide magazine is distributed free three times a year to residents and guests throughout the Sun Valley, Idaho resort area communities. Subscribers to the Idaho Mountain Express newspaper will receive the Sun Valley Guide with their subscription. |

Closet AFTER
fix habitat
Create more
space
Need more living
space? If a major remodel is out of the question, read on. This is an
easily implemented, inexpensive and construction-free solution to
creating more living space from an ordinary built-in closet.
writer: Cornelia
Russo, photographer: David N. Seelig
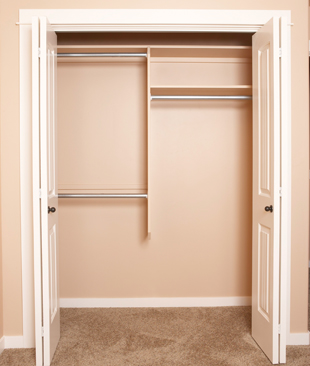
A plain, empty closet
with bi-fold doors, shelves and closet poles.
Open your closet and discover more space. Start by removing any poles in
the closet and the two bi-fold (sliding) doors. Don’t throw them away;
they can be used to add decoration to the room. Turn one or both upside
down and position them flanking each side of a nearby window or place
one in a corner. Paint them a statement color to add a bold,
complementary feeling.
Furnish the area inside
and around the closet as if it were the actual, original room space.
Position the closet doors elsewhere and paint them a bold color,
as attractive accents to the design.
Paint the inside of the closet, shelves and all; pick up on a
color from elsewhere in the room.
Paint the inside of the closet, shelves and all. Choose a strong and/or
contrasting color for the back wall. Select that color from an object
elsewhere in the room: a rug, a fabric or a piece of art. The side walls
and shelves should be painted the color of the room, to carry through on
the illusion that the room is bigger than it actually is.
Furnish the area inside and around the closet as if it was the actual,
original room space rather than reclaimed closet space. A chair, books
and magazines, personal mementos and art are just a few great additions.
If necessary, add more shelves. Let this newly found area be functional,
but also full of design and imagination.
The all-important aspect of lighting needs to be addressed; otherwise,
your new space will be dark and gloomy, like a closet. In the “after”
example, small-scale track lighting was hidden on the upper inside wall
to highlight the art and add ambient mood lighting. Or, you might just
place a floor- or wall-mounted lamp, small table lamp or accent light in
the area.
When arranging accessories, several points need to be addressed. First,
variety and coordination are key. For example, different sizes, shapes
and textures can be displayed on different planes and turned in
different directions. With this space we used large landscapes, a medium
textured pillow and a small metal key; some accessories were pulled
forward, some to the back. Second, odd numbers in groupings are more
visually interesting than even numbers. Third, small open areas are not
only OK, but also necessary. The eye needs a place to rest. Finally,
accessories on the upper shelves should face downward because they are
viewed from below. For example, turn greenery on its side allowing it to
hang over and down.