| Current Issue : web |
| Current Issue : PDF |
| features |
| At home in the lodge |
|
The
art of collecting art |
|
23 days to rehab your habitat: A homeowner's diary |
| sections |
| Habitat Hits |
| Organize it |
| Know it |
| Fix it |
| Buy it |
| Grow it |
| Pick it |
| information |
| Spring calendar 2007 |
| Luxury Living |
| the guide |
| Last Winter |
| Last Fall |
| Last Summer |
| Editorial Submission |
| Calendar Submission |
| Advertising Submission |
| Advertising Rates |
| About Us |

|
|
Copyright © 2006 Express Publishing Inc. All Rights reserved. Reproduction in whole or in part in any form or medium without express written permission of Express Publishing Inc. is strictly prohibited. The Sun Valley Guide magazine is distributed free three times a year to residents and guests throughout the Sun Valley, Idaho resort area communities. Subscribers to the Idaho Mountain Express newspaper will receive the Sun Valley Guide with their subscription. |
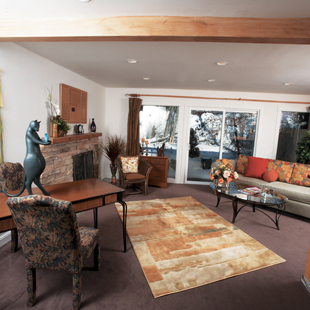
The remodel AFTER
23 days to rehab your
habitat:
a homeowner's diary
Cornelia Russo, a decorator and
interior designer, remodeled her Ketchum condo in three weeks. The
following is her diary of the process, full of useful tips and handy
hints for any aspiring remodeler. Photos by David N. Seelig
When are you going to start my
remodel?” queries the excited homeowner.
“Not until we are ready to finish,” declares the crew leader.
The startled homeowner is taken aback, but according to the Journal of
Light Construction, this answer is right on. Make decisions, order
materials and coordinate scheduling before remodeling. During a
whirlwind 23 days, Cornelia Russo acted as her own general contractor.
She directed the middle phase of a structural and cosmetic remodel of a
1980s townhouse on Trail Creek. Blackened lava rock, small closets,
textured sheetrock along with 25-year-old painted paneling, hollow doors
and drafty glass were just a few of the items on her demolition hit
list.
GOALS
Floors
Great room, dining area, foyer and
storage closet.
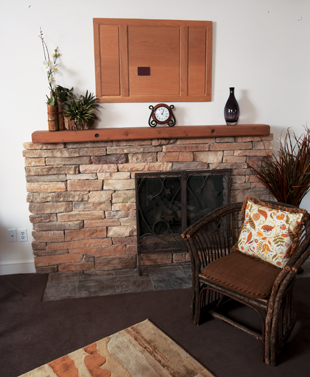
Demolition: Increase natural light
with a 6-foot glass panel and museum white paint. Create and outfit a
walk-in storage closet. Redo slider and heaters to save energy. For a
larger room feel, redo fireplace in low profile, light-colored stone;
install eight recessed lights plus in-wall heater; remove baseboard
heaters, smooth new sheetrock plus existing walls/ceiling. Reconfigure
kitchen cabinets until final phase. Update: Replace doors, hardware and
trim work. Set kitchen track lighting and plumbing and electrical
groundwork for next phase while sheetrock is demolished. Design
elements: Mobile color board, faux wood beam, mantel panel.
Floors
Master bedroom, closet and balcony
plus hallway.
Demolition: Update with energy-saving heater, doors and
new hardware, new sheetrock and trim work plus stain and paint. Expand
and outfit walk-in closet/dressing area. Create a bigger feel through
smoothed walls/ceiling, in-wall heater, paint closet door and repeating
room color within, plus relocate new, wider double-entry doors. Add
natural light in blind bath (etched transom) and in expanded closet
(window).
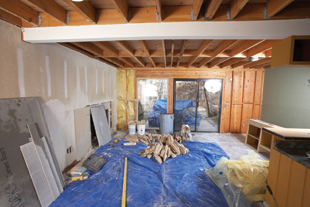
The remodel BEFORE
Week 1
Demolition and Framing
Prepped site. Protected shrubbery, carpet, etc. Furniture went outside.
Demolition begins, long overdue. Hammers pound. Broken sheetrock and
dust are everywhere plus an obstacle course of tools and materials.
I love it!
Set up my work area on site. Walked through job assignments; explained
overall plan to workmen, sometimes in written specifics.
First major problems. Tracked down doors and windows with company
supervisor; they had never been ordered. (Thank heavens for Carole at
Sawtooth Door). New keys don’t work, and the dumpster is wrong.
Phoned mason to adjust fireplace and extend patio step (I forgot that
the slider handle reversed).
Last-minute city insistence on engineer drawings for master closet.
Thankfully I had reserved an engineer, just in case. Immediate pow-wow.
No delay. Go Jay!
Decided to insulate first floor ceiling and faux paint beam. Unforeseen.
Performed end-of-day site checks; collected progress reports.
Plumber and electrician returned Saturday to stay on schedule. Love
that!
Passed framing inspection.
Reviewed week; planned ahead: calls, goals and lists for crew.Cleaned
site.
Week
2
Framing, insulation and
sheetrock
Inspections: passed electrical, plumbing, insulation and sheetrock.
Building rules changed. Remodels now subject
to more inspections. Keep asking questions and listening.
Wake up happy and hopeful each day, but by sunset feel the weight of the
world. Thank heavens for sunrises.
Door delivery problems. Reevaluated; changed specs.
Four snowfalls in five days played havoc with schedules. Nervous as the
furniture is still outside under tarps. Falling behind. De-stressed at
gym.
Electrical inspector Larry Wharton’s warning: “Homeowners lose time,
control and money by not being on site for instant decisions and to
handle roadblocks.”
Adjusted mantel stain technique and faux base coat for beam. Reluctantly
postponed beam artist, who was painting the beam to look like wood.
Existing kitchen cabinets reconfigured until phase III.
Sheetrocker duo, dedicated. Lunch, my treat. Added more ceilings to
smooth.
Trims/moldings need to be special ordered. They are needed in 36 hours!
Idaho Lumber came through.
Logged workmen and progress. Reviewed expectations. Completed daily site
visits.
Cleaned.
Planned next segment: calls, schedules,
homework.
Week
2
Sheetrock,
painting/staining, install doors/windows and finish carpentry
Beam painted like wood. Wow!
Mike and Doug painted/stained through the weekend. Outstanding. Changed
my mind on the bedroom colors, due to some twelfth-hour
inspiration at the paint counter!
Refurbished mantel and had fire screen installed, including salvaged
wood panel I broke in two—
time for a redesign.
No place to park. Carpenters and more returned to outfit closets, add
trim work and install doors,
hardware and windows.
Wrong hinges and missing hardware and windows. Ugh, a full-plate.
Eliminated need to wait for one window problem by doing etched glass
transom—a piece of glass directly above the door, as wide as door and
about eight inches high.
Everyone is cranking out, catching up. Lunch on me.
Stop. Four-day weekend plus cell phone network down for three days.
Challenges…
Lost both painters unexpectedly. Scrambled. Joe and Humberto Jr. to the
rescue.
Discovered fence not on property line, blocked new window. Carpenter
(Rod) saved the day. Mason needed back.
Daily site visits. Reviewed expectations. Went over punch list (a list
of everything that needs to be finished before they leave and get paid)
with crew.
Irma and staff—final cleaning. Lucky me.
Epilogue
Preparing
to leave, I paused proudly at the job site’s front door to admire
everyone’s work. I couldn’t help but reminisce on how the crew watched
out for me. In turn, as their general contractor, I tried to make sure
that job assignments and materials were ready.
My project-tested parting advice to any aspiring remodeler is: Rejoice
in what goes right and don’t lament what doesn’t. Remember you are
dealing with individuals. Large or small, a project that personalizes
your habitat and expresses your spirit is an ordeal, make no mistake,
but it is also a wonderful experience with its own rewards.
Despite weather and holiday delays, the project, including the add-ons,
was completed on time except for a short punch list and two small,
problematic glass panels. (But we are framed, painted and ready to go
for them.) Including the unforeseen items, such as engineer drawings and
those done-by-choice extras—insulated and smoothed ceilings, faux beam,
mobile color board, electrical parts swapped to white, etc.—we came in
at just under our budget of $25,000.
Remodeling
Tips
Plan
your work; work your plan
Lay the groundwork for your project in advance: goals, designs, permits,
orders and schedules. Have your specific goals and simplified overall
picture of the entire project understood by each work person. You alone
can direct the crew to your final vision. Sketch and graph changes
including the placement of furnishings and forgotten items like which
way doors swing and outlets. Consider form (design) and function
(practicality). Repeatedly walk through the future space mentally and
physically. Ideas evolve; some change. Is there enough counter space? Is
the cable in the right places? Door to open left? Terry Allsop, a
homeowner/contractor, advises, “Check and recheck before construction,
then again every day on site.” Also remember to plan your daily
de-stress strategies, such as exercise or a movie.
Educate yourself
Read and ask questions of inspectors, architects, engineers, craftsmen
and homeowners who have remodeled. There are no stupid questions.
Encourage all to share their expertise on how the system works. However,
the final decision is yours.
Working with your crew
Check references, work ethic, insurance and licenses. Walk through the
agenda on site with the workmen. Reserve dates far in advance. Structure
the project so you feel comfortable. Check out construction
Spanish-language courses. Set up a work/desk space on site. If you’re
your own contractor, get the legal assurances you need in writing. Learn
names; provide water and snacks; relate to the crew. Always have your
project file with you.
Know yourself
Acting as construction general contractor is more than a full-time
commitment. Anxiety, frustration, exhilaration and satisfaction go with
the job. Assess your strengths and weaknesses. Can you rise early,
execute lists, make it to meetings, run errands, do site visits, make
phone calls and complete other related tasks? Then, at day’s end, make
final site checks, handle the day’s twists, and complete your homework
along with new lists and schedules for the next day and beyond? Be
brutally honest. Your answer affects the project’s success.
Allow extra time and extra money
Build in catch-up days and reserve extra money. Any construction project
will take longer and run over on costs by at least 10 to 20 percent.
Maintain construction areas
Protect your belongings. Clean up as you progress. Provide a dumpster
and restroom.
Local companies/people who worked on the remodel King Electric: Brad King, 788-5013. 5B Plumbing: Justin McKenzie and crew, 721-2101. Sheetrock/All Purpose: Gary Henderson, 720-0850, Joe Thornton. Framing/Carpentry: (Lead) Rod Hawkins, 481-0285, Travis Scott, Pete Jenner. Columbia Paints: Tony Polichetti and staff, 726-8030. Painting: Doug Neff, Mike Porter, 721-1558, Humberto Carillo Jr., 721-0145. Sawtooth Door Company: (208) 734-7770. Christensen Engineering: Jay Christensen, (208) 654-9911. Artist: Jeanne Knott, 726-1917. Idaho Lumber: Mike Brunker and staff, 788-3333. Stained Glass Studio: Hermann Lirk, 726-8141. Stock Building Supply and staff: 726-3364. Cleaning Service: Irma Regal and crew, 788-7775. Furnishings: The Open Room, 622-0222 and Cornelia Russo Design & Decorating, 788-2194. Flowers: Primavera, 726-7788.